Sunday 8 November 2020

Tow Bar And New Tyres For The Mercedes ML350

 So after we bought the caravan, the race was now on to get a tow bar fitted!

There were two choices, a detachable or a permanent.

I must admit that a detachable one although when not towing, makes the car look better and stops you cracking your shins on a regular basis, but, they really do not appeal to me.

Guess it's the word detachable, I would always worry that it wasn't going to hold or that I would do something wrong and I'd look back and not see a caravan in my rear view mirror.

Plus they were more expensive.

So we had a permanent one fitted by Ambrow Trailer Services Ltd in Christchurch for £375.00 inc VAT which I thought reasonable enough.


The next thing was to fit new tyres to the ML.

They were due a new set all round so after a bit of research we got some General Grabber All Terrains fitted at £640.00 inc VAT and fitting.

I was a little concerned that being a chunky tread we would suffer from an increase in road noise.

However, I haven't noticed any and look good having a slightly lower profile, more in keeping with the road tyres they replaced.

I had these supplied and fitted by New Milton Tyres  who got them in and arranged to have them fitted within a couple of days of ordering.


I now feel that we can get out of any wet and sticky situations we may find ourselves in with these fitted.

Next all the accessories that go with caravanning!

The journey continues.............

Bought A New Caravan - Swift Conqueror 570 - Back In The Fold!

Well, here we are again!

We had been playing with the idea of buying a caravan for a while now, as it fits in perfectly for our long term plans (more about that another time)!

So a few weeks ago we were out in the car and out of the blue I suggested we go take a look at caravans and get a feel for what was available within our budget.

Over to Lady Bailey Caravans, which for you long term readers is where I bought my Lunar Lexon 640 and where I started my full time living experience.

Before we got there we gave them a ring to ensure that they were open and the caravans were ok to look around, they were so off we went.

We had very specific criteria - Having full timed I knew what worked and what didn't.

So a fixed bed was a must, although I was flexible on an island (any orientation) and a separate shower and toilet.

The dealer had a couple in stock, and we were directed to two, both met our criteria and were within budget.

Like you do, we pulled out all the drawers, opened cupboards and lockers, checked and prodded about and then sat in each for a bit, both were great but did not grab us.

We did agree before we arrived we were only going to look and not buy! Last time we did anything like this we were looking for a new car and ended up buying a Mercedes ML350 there and then and on the spot!

So we had a look around the rest of the stock, and came across a rather lovely looking caravan around the back of the dealers.

Above budget, but it just had that "Wow" factor that the other two did not have.

It was a Swift Conqueror 570 - single axle.

It met all of our requirements and the finish and look was far superior to anything else we had seen.

We were both really taken by it, but we were only looking at this stage!

Talked to the Salesman and got the details, it had extra's fitted to it - The Alco Electronic Stabilisation System and an on board 35l water tank.

It really was a lovely caravan, but true to our word we were only looking today.

We drove away congratulating ourselves for being sensible and decided to call in at another dealers on our way home to continue our search.

Having looked at a number of caravans, nothing came close to what we had seen, and deep down we both accepted the inevitable, called Lady Baileys and told them we were coming back and would be back with them in less than an hour!

An hour later we were the proud owners of a new caravan!

Due to Covid it was a couple of weeks before we could collect it, and arranged to take delivery on the 10th October.

This gave us enough time to buy all the equipment and kit the caravan out.

I'd got rid of practically everything, so it really was starting from scratch. In my next blog I'll go through the items I bought. 

Thankfully having the experience I have, it was fairly easy to assemble the required gear.

Below are the pictures I took whilst the caravan was still at the dealers.


The quality of the inside I felt was exceptional, certainly compared to my Lunar and to the other two caravans that we looked at.

The race was now on to get a few things organised, like fitting a tow bar for starters!

Hope you have enjoyed reading this, I cannot promise to blog as much as I used to - time is a factor these days.

I will be returning to update, I have plenty to blog about since we took delivery of the caravan!

This blog I have decided to run, purely as a caravan blog, as this was it's intended purpose to start with, and my other blog I will use for my general travelling about.

I'm what's known within the truck world as a "Tramper" which means that during the week I live in my truck, working stupid long hours and driving long distances! I'm sure the two blogs will cross over with each other but will try to keep them separate.

If any of my original readers are reading this (Robin & Jenny in NZ) hope all are well and keeping safe!

The journey continues.........

Monday 11 May 2020

Where The Heck Have You Been? HGV Trucking!!!!

Well, to cut a long story short - I've been rather busy!

Over the last couple of years I have made a few changes to my life regarding work.

It's been hard work and cost a bit of money but for the last year I have been qualified as a Class 1 HGV Driver.

Yep, big trucks!


It's been a bit of a learning curve, and even though I've been driving these for a year now, it is so easy to get caught out!

So, every day is still a school day!

I am enjoying the experience, the hours are long, but the pay is good and I get to travel all over the UK.

I tend to leave home on a Monday and get home Friday evening, sometimes Saturday, if I run into problems.

But, like I said I enjoy the challenge and like the lifestyle.

Living in a caravan certainly sets you up for living in the cab of a truck for a week at a time!

Now, as you have gathered, this blog is updated rarely, I choose another blog over this one which is http://fatbloketravels.blogspot.com/

This is far more up to date with what I get up to on a regular basis, but not only that but I have been brought kicking and screaming into the 2020's and started to VLOG!

So my Youtube channel can be found here! 

https://www.youtube.com/channel/UCk9i7P8r6rkIRKrzwJQJ44w

Here you can see more of me, driving, cooking and talking nonsense!

Hope you get a chance to pop across and view my video's

Until later - stay safe!!!!!


Tuesday 25 September 2018

Portable Crusader Gas BBQ Grill Review

I was recently contacted by the guys at Electrical World and asked if I would take a look at one of their portable Gas BBQ's and see what I thought.

As you are probably well aware I all ready have a CADAC and to be honest it is a brilliant bit of kit, something I would not want to be without.

So for me to want to take the Crusader Gas BBQ away with me it would have to be good.

For the purpose of this review I will start right from the beginning and give a full no nonsense review on how I found the BBQ and Electrical Worlds Customer Support.

The BBQ arrived well packaged and in a sturdy box, so unless it is driven over it should arrive with you safely!

Unpacking it I found that all parts were there, it was well packed and it came complete with a set of English instructions.


Unpacking the contents I laid them all out to see exactly what was in the box. It is self assembly but to be honest it is very straight forward and the instruction manual tells you exactly what and how to do it. You only need basic tools which you would normally have within your home.


Once I had assembled it I was intrigued as to why there was a hole in the metal work (as shown in the photo below). Never having really looked at the workings of a gas bbq before my assumption (proved wrong) that this was not quite right!

So I contacted customer services who investigated for me and came back with a straight forward answer that the hole was there to allow air into the gas mix to ensure a better burn.


I used the hose from my massive garden BBQ to save a bit of time, but a top tip here - If you have ever taken a hose from a BBQ you will of noticed that the hose becomes rigid. I usually cut them off as trying to pull them off can be impossible.

To make life easy when pushing them back onto the nozzle,  simply place them in a jug of boiling water for a few minutes, the hose softens and it is then easy to push in on to the nozzle, making sure you securely clamp it with a jubilee clip.


It comes complete with a bag of lava rocks, and to be honest it could do with more, as the rocks disperse the heat from the gas jets. As you can see the rocks did not cover the base completely.


It's sturdy and well balanced and works perfectly as a table top BBQ, my table did not get scorched. One thing that is quite handy is the legs fold up and over the top of the lid to secure it.

However, this does mean that the hose has to be detached either from the gas bottle regulator end or from the nozzle directly on the BBQ via the jubilee clip.

I would suggest it is removed from the regulator end to make life simpler.


I decided to cook 4 lamb steaks with a marinade. I laid them out end to end to measure how the spread of heat would cook them.


I found that the heat was very centralised and really the food had to be placed around the burner to achieve the best results.

I also found that there was little control over the intensity of the gas burn, all this means is that you have to be a little bit more skilful with your cooking.

The trick to all BBQ's is to keep an eye on what you are cooking, rotate and turn the food frequently and keep and eye on it at all times!


I must say I found it easy to cook with and the steaks were cooked to perfection.

I'm not sure how to pack the lava rocks for travelling, bouncing around in the back of your vehicle is liable to either damage the rocks with bits breaking off or the noise of the rocks clanging around would drive you mad. So there is that to think about.

The questions I set out before I started to even unbox the BBQ were

1. How easy is it to put it all together?

2. How many can you sensibly cook for at any one time?

3. Is it easy to use, light, turn off, clean?

4. How easy is it to pack away?

5. Does it cook your food well?

6. Finally - Would I buy one?

The answers to these questions

1. It was easy to put together, with no fuss or drama, any one with an ounce of common sense would be able to do it.

2. I cooked for 4, I would not of been able to cook anything else on the BBQ once I had loaded it with 4 lamb steaks. Obviously if you are only cooking sausages you could cook more.

3. It is easy to use, it lit first time with a gas lighter, turning off was very simple and it was easy to clean.

4. It packed away simply enough but as mentioned, transporting the lava rocks may be an issue

5. It cooked the food evenly, but as with all BBQ food you need to frequently turn and rotate.

6. The answer is yes, sometimes the CADAC is just too big, especially if there is just the two of you. This is small, lightweight, easy to use and to be honest for the price it's a no brainer.

So yes, I was very happy with the Crusader BBQ - you can buy it direct from Electrical World direct from Ebay by clicking on the link HERE

Happy camping!


Friday 13 October 2017

Checking For Damp In Your Caravan Or Motorhome

Have you ever checked your caravan or motorhome for damp?

Like most people if they were honest, probably not.

That musty smell, do you put down to just stale air as your van has been shut up for a while.

Perhaps it is something more sinister, the dreaded damp!

Damp can go unnoticed for a while, and by the time it is discovered, the damp has well and truly set in and it’s expensive to sort out.

Checking for damp is vital, not only on your own caravan or motorhome, but on any that you are thinking of buying, even a brand new one can suffer from it!

Damp can be caused by a couple of things, firstly water ingress, through cracked sealants, or damage to panels, roof vents or windows, it can also happen through rising damp and your floor rotting out!

Or the other way of damp is via condensation and poor or zero ventilation.


You may also suffer from weeping water pipes, when was the last time you checked all of yours?

So Damp can be a real problem, but it is preventable and less costly if you catch it quickly.

Below is a guide to what to look out for, how to spot it, and where to look.

Damp Guide

Equipment required:

Torch, Kitchen Roll, Damp Meter, Step Ladders and a Sense of Humour!

Now, this does require you to spend time on your hands and knees, so knee pads are optional!

For ease of wording I will be referring to a caravan throughout this guide, but the procedures are exactly the same for any other type of campervan/motorhome.

Firstly it is easier if the caravan is empty as you are going to be poking around in all the places that are usually full of all the things you think you need but actually never really use!

So let's start with a methodical approach.

Outside

The Door - Does it open and shut as it should do?

Is the rubber seal intact all the way round or is it damaged or crushed?

We are looking for ways that water can come in, a crushed or damaged seal is an easy water entry point.

Starting from the front of the caravan, open up the front locker, remove everything and have a look to see if there is any way that water is seeping in and pooling - especially if you have fitted trays for gas bottles etc.

Check to see that the back panel inside the locker is not damaged.

The locker should be vented in the base, make sure that nothing is covering these vents.

Check all the front windows for cracks and that they all open and close properly, none of the seals are crushed or broken. You can do the same for any side or rear windows as you work your way around the caravan.

On the side of the caravan, make sure that the awning rail is intact, and not damaged in anyway. It is not uncommon for an awning rail to be pulled away from a caravan, especially at the ends/corners. If there is sealant running along the top of the awning rail, make sure it is intact with no cracks or splits.

The same can be said for any guttering around the van.


Check the bodywork of the caravan, I know it sounds obvious, but there can be hairline splits or degradation of the plastic, especially on older vans. Check the handles on the van, these can very often be a water entry point especially on older vans where the screws are visible.

Around the back, check to make sure that the light clusters are all sealed properly. Water can enter the light cluster, fill up, then run down the wires straight into your van! Any cracked or damaged clusters, replace as soon as you can.

If you have side lockers, check inside them, and once again, check seals to make sure they are not crushed or damaged.

Air vents, fridge and water heater, make sure they are not damaged.

Now before you get the step ladder out, let's take a look underneath the caravan.

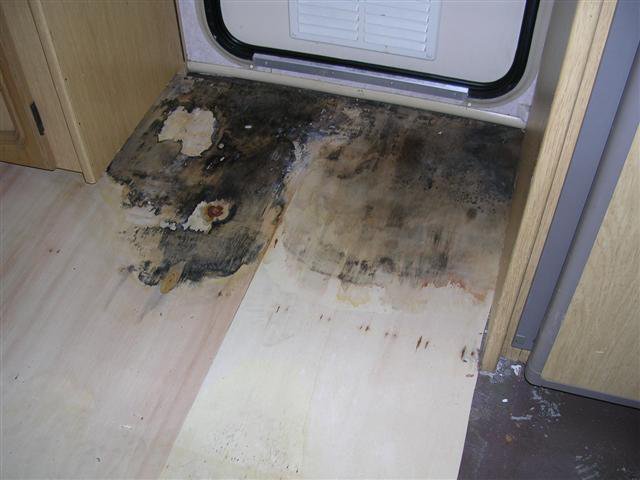
You are looking for any obvious damage or worse case scenario delamination of the wood floor. Delamination of the wood floor occurs when the layers of the plywood come apart due to the glue failing, either through damp or constant use.

There are a number of places to check, but if you can I would take a good look around the whole floor pan.

But the Hot Spots to check would be:

  1. The very front - due to water spray and debris being flicked up by the tow car.
  2. Wheel arches - These should have a plastic liner, but make sure that they are not damaged, and that they over lap the floor and not butt onto it!
  3. The front and rear corners of the caravan, as the gutters and roof will channel the water to these points.
  4. Where the waste pipes exit the floor. Water can not only enter here but could also be coming from the waste pipe itself!
  5. The corners, where you may of accidentally hit the caravan, the plastic may of bounced immediately back into shape leaving no trace but the wooden floor or seams may of been damaged.

Now to the roof, make sure you have someone to steady the steps for you. Take a good look along the roof edge of the caravan, especially the left hand side where you may of got a bit close to the hedge a couple of times. Branches are brilliant at hooking out sealant!

Check the roof where items come through, such as gas flues, tv/radio aerials etc. Also check any roof lights/covers for any obvious damage. It maybe easier to check from inside the van stood on a small set of steps with your head poking up through the window!


Inside:

On entering the caravan for the first time in a while, how does it smell? Does it smell musty or damp, as we mentioned earlier, it is easy to blame it on an old dog blanket or a pair of shoes.

Depending on the size of the caravan and the weather, remove all the seat bases, and if dry put them outside to give yourself some space. Now, remove the slow cooker which you thought you would use but never have, along with all the plastic bags you thought you would save, and spare blankets you keep in case you get cold.

Now that the space is clear I want you to get down on your hands and knees and with a scrunched up piece of kitchen roll dab it into all the accessible edges and corners. Does it stay dry? Hopefully it will do!

This is where you start using your Damp Meter, really easy to use, just switch it on and start prodding it about along all the edges and right into the corners.

On newer vans it may be a little tricky to do this due to the lack of exposed wood.

Using either a 2 or 4 pin damp meter does require you to push the pins into the wood, running in line with the grain.

The way it works is quite simple, the electrodes (pins) measure the flow of current between the 2 or 4 pins, the greater content of moisture the higher the flow of current.

A damp meter is not expensive, you can pick them up from either Amazon or Ebay for very little money.

You can check out this Digital Damp Meter Here it is currently at £7.99 including postage.

damp meter.jpg

Look to see where your water pump and water heater is situated that all pipes are secure, and there is no signs of any leakage, this is often a place to find damp, the push fit connectors tend to come loose over time. So make sure you dab the kitchen roll around the floor.

Moving into the kitchen area, look under the sink, check to make sure that the waste pipes are not damaged, it’s amazing how many odd marigold gloves you will find!

If you have access to under the cooker, check here, there are often floor vents here.

You will probably have no access to the rear of the fridge, and I would not advise pulling it out either! But check cupboards either side.

Check around the bathroom area for any obvious leaks, then check around the outside of the bathroom, if there is water leaking from the bathroom it may show up either side.

If you have a rear fixed bed, this can be a place for mold to gather quickly. When not using the caravan for any period of time I would prop up the bed to allow proper air flow. Just stick your broom in to hold it up.

Remove everything from underneath the bed, climb in the void and start checking.


If you have floor to ceiling wardrobes, make sure you check not only the base but the tops as well.

This is also the case for any top lockers/storage cupboards you may have.

Once you have completely done the whole floor, think about looking around the windows, and checking the seals from the inside.

Finally move to the inside of the roof, checking vents and hatches for any damage or moisture ingress.

Hopefully you will be ok, but if you detect any type of damp I would personally take it to your local caravan dealer who can advise you on the best course of action.

It may not be obvious to the untrained eye where the actual moisture penetration may be coming from. Water does have a tendency to run before emerging at a weak point.

I am no expert on damp, but having lived full time in a caravan for 4 years I do feel I know a few things about what to look out for. However, please feel free to leave comments with anything I may of forgotten!

Till next time...........

Thursday 17 August 2017

How To Gain More Followers On Twitter Organically Using Lists 2017

So I hope you have been clicking and following people you find interesting on Twitter.

Today In this blog post we are going to take a look at a smart way of following people, as you cannot tweet if you have no followers!

I said I would try and make it easier for you to follow people.


First on the list (joke) is LISTS.

To find if you have been added to any lists by other followers click on your home page, look to your right along the bar you will see a little circle with your profile picture on it.

If you hover your mouse over it - it will say "Profile and Settings" click on this and it will reveal a drop down menu.

Here you will find "Lists" click on this and a new page will open.

In the middle it will say "Subscribed to" and "Member of" if you are ahead of the game the lists that you have subscribed to will be in the first one, and if anyone has added you to their lists then you will be in the "Member of" one.

Click on this and it will reveal which lists you have been added to.

Now the thing with lists is that they are compiled by people who generally all have common interests, so click on any that are in your list and it will open up a new page where on your left hand side you will see the following - "members" and "subscribers" if you click on either of these it will reveal a list of like minded people.

Click away and see who follows you back.

Tip - Don't bother with those who haven't bothered to put up a profile picture.


If you have not been added to any lists do not worry, it happens in time.

So now it's your turn to start making your own lists.

Why make a list?


Well, there are a couple of reasons. Making lists is a great way to bring like minded people together.

Over time as you follow more people your twitter feed will get so busy that there will be a good chance you will miss tweets that you may find of interest.

By creating lists of people you can quickly scroll through your favourites to see what they are saying.

So, as an example you run a Camp Site. Make a list with that as a title and every camp site you come across add them to your list. You do not need to follow them, just add them to the list.

Why do you not follow them?

Well, Twitter in it's wisdom runs some fairly strange metrics, once you have followed 5000 people if you are not being followed by 5000 people or there or there abouts or more, then they stop you from following new people.

The name of the game is to keep it fairly evenly matched between followers and people you follow. Not always easy, but by making a list you can funnel those who you find interesting but not on a daily basis into these lists

OK, lets take a look at how you make a list. 

Go to your home page on twitter and look to your right hand side where your little circle with your profile picture is.

Hover over this and it will say "Profile and Settings" click on this and a drop down menu will appear.

At the top of the menu is "Lists" click on this and a new page will appear.

On the right hand side is a box that says "Create a list" and a button that says "Create New List" click the button.

A small box appears, type in the name of your list "Camp Sites" decide if you want everyone to see this list or just keep it private. Personally I would make it so anyone can see it, then hit save list.

Congratulations! You have now made a list.


Now to fill it. So find a twitter account that you want to put into your list, open up to see their own twitter page and on the right hand side next to where the "Follow" button is placed is 3 blue dots.

Click on this and a drop down menu will appear. The second one down will say "Add or Remove from list, click on it and another drop down box will appear with your list or lists! simply tick the box next to your "Camp Sites" and your done! Click on the "X" will take you back to their page.

It really is that simple.

You can make many lists, this way you can group people together, and your twitter feed does not get clogged up. The other added benefit to this is that who ever you add to your list is informed by twitter that you have done this, so they may be curious in taking a look to see who you are.

Maybe they will follow, maybe they will click through to your website. It is definitely worth building lists.

However, I know that not everyone has the time to do this, you are at the end of the day running a business.

This is where I come in, I can take the strain away from you, for just a small fee I can build you a list relevant to what you want to see. You name how big you want this list to be and you pay me per person added.

Once more you are in total control of your budget.

If this is of interest to you please feel free to drop me a line at joolsmauro@gmail.com

Hope to hear from you!


POST - How To Deal With It - Most Common Questions

The most common questions I get asked are - What do you do about your post and what do you do about an address?

There are a number of different options available to anyone who wants to have their post held or redirected whilst they are away full timing. It really does depend on each person's individual circumstances.

But trust me, there is always a way to get things done, you just have to think a little bit different than the average person!

So, how did I go about having my mail delivered to me whilst I was full timing in my caravan?


All the time I was full timing I stayed within a geographical area due to work commitments, if you intend to travel for extended periods there are other options later which I will tell you about as we go.

Quite simply, when I first started full timing I initially set up a Post Office re-direct to my parents house.

I was lucky enough that they were happy for me to do this, but to be honest I had at least a dozen others who were happy for this to happen. All you have to do is ask!

I would visit on a regular basis and collect my mail, if something looked urgent, my parents would put it in a jiffy bag and repost to either my work address or my partners work address.

Your company should be ok with this as long as A) you ask their permission and B) you don't make it a regular habit.

Once again, I was lucky that I could have things sent to my work with no problems at all.

You are not committing any crime by doing this, you are just getting your mail redirected.

After 3 months I had informed all the relevant companies of my new address and all the junk mail, well I’m afraid that is still probably going to my old address!


Banks and insurance companies like to have an address, they will not accept PO box style addresses.

So the above option was the way forward. You simply need to find someone who is willing to have your mail delivered to their address. Relative, friend, etc, think long and hard, we all know someone who would help.

Redirects from the Royal Mail can be for 3, 6 or 12 months, all with a cost. For further information click on the link - Royal Mail Redirect.

If you find that you are having difficulties with using a redirect service there is something from the Royal Mail called “KeepSafe” they hold your mail for a certain period of time until you collect it.

The length of time does appear a little strange as they are set at 17, 24, 31 and 66 days, all with a cost ranging from £14.00 for 17 days to £45.30 for 66 days.

The only thing with this service is that you do need to have an address to be able to subscribe to this service. For further information click on the link Royal Mail KeepSafe.

Whilst full timing I stayed on a few sites where they were happy for me to have packages delivered, but once again, you do need to have built up a really good relationship with the site owners before you ask.

If you have an address but you do not want your mail to go there then there is a PO box service operated by the Royal Mail. Click on the link for further information Royal Mail PO BOX


There is another option that is slightly cheaper than the Royal Mail and that is a company called Mail Boxes Etc. There are a number of these types of companies around but this is probably the most well known and respected company.

Once more you do need to have an address and proof of id for you to open an account with them. For further information please check out their website at www.mbe.co.uk

Having an address is important in this day and age, there really isn't any way of getting out of it unless you are totally happy to live off grid!

Please feel free to contact me at joolsmauro@gmail.com with any specific questions, I'm not brilliant at replying straight away but will get there in the end!